


Click HERE for guide to how to wash your ceramic coated vehicle
PROCEDURE
We congratulate you on applying ceramic coating to your car with Car Studios!
We understand your love for your car and are here to assist you in maintaining its shine and protection. It's essential to understand why washing your ceramic-coated car is necessary. We recommend
washing the car at least once every week or fortnightly to keep it in pristine condition.
Ceramic coating is an excellent product that protects your car's paint from UV rays and adds gloss, deeper colour, and hydrophobic properties. It also has self-cleaning properties means cleaning and drying your ceramic-coated vehicle is much more manageable.
However, it's crucial to remember that ceramic coating isn't a universal solution for all paint protection problems. Although it's highly effective against some contaminants, regular washing and detailing, annual ceramic inspection still be necessary to prevent damage to the paint surface.
Important: When washing your car, we recommend using specific products and methods to maintain the ceramic coating without voiding the warranty. It's best to avoid
- Washing your car under direct sunlight and do it in cloudy conditions or early morning or late afternoon.
- Don't use automatic car washes or non-PH-neutral shampoo
- This helps prevent the product from drying on the car's surface, making washing much easier. We also suggest using CFC Foam or other recommended products by CarStudios*, PH-neutral shampoo or specially formulated products that are safe for ceramic coating.
Please avoid shampoos that contain conditioners, waxes, or sealants.
Remember, regular washing and detailing can help maintain your car's shine and protection, allowing you to enjoy it for years to come!
PRE-RINSE
To prepare your vehicle for washing, it is recommended to start with a pre-rinse. This involves applying a layer of snow foam, such as CFC Foam, to the entire vehicle and allowing it to dwell for 3-5 minutes. This step helps to loosen and soften any contaminants, dirt, or particles that may be stuck to the car's paint surface, while also cooling down the wheels and tires.
After the foam has dwelled for the recommended time, it should be rinsed off thoroughly with high-pressure water. This step helps to remove the bulk of the contaminants and dirt from the vehicle, making the subsequent wash stage more effective and reducing the risk of damage to the car's paint surface.
- Pre-rinse: snow foam (CFC Foam) the whole vehicle and let it dwell for 3-5 minutes; this step will soften all the loosen-up contamination, dirt or particles and cool down the wheel/tyre before the proper wash stage.
- After 3-5 minutes of dwell time, rinse off the foam.
WHEELS
It is crucial to keep in mind that the wheels tend to be the dirtiest part of a vehicle. As a result, we should prioritise cleaning the wheels before moving on to the painted surfaces. This means that we will begin by thoroughly cleaning the wheels.
Things to prepare:

-
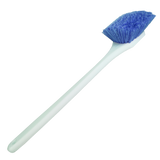
- A tyre brush,
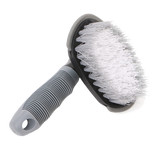
- A wheel brush with soft bristles, and
- A long arm brush for the inner barrel,
- Degreaser,
- CFC Fallout, or PH-neutral iron removal / Wheel Cleaner.
- Spray Degreaser on the tyre/rubber to remove the existing tyre shine. Let it sit for 30 seconds, then use a tyre brush to scrub it and rinse it off with water.
- To remove brake dust, spray CFC Fallout or pH-neutral iron remover on the wheel's surface and allow it to sit for 2-3 minutes.
- Agitate the wheel by using a long arm brush, particularly for the inner barrel of the wheel. If necessary, you may add a small amount of snow foam
- Next, utilise a soft-bristled brush to clean the face of the wheels, but make sure to scrub gently to avoid scratching them.
- Rinse off.
BODY OF THE VEHICLE
Things to prepare:
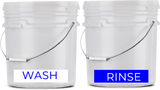


- One RINSE bucket with a grit guard,
- One WASH bucket,
- Washing (microfiber) mitt
- CFC Foam or PH neutral shampoo with no No waxes / sealant.
Process
- Two buckets system:
- start by filling the RINSE bucket with a grit guard at the bottom (if available) to avoid larger dirt particles from mixing in the water. Then, fill the WASH bucket halfway with fresh water and add 3-4 caps full of CFC Foam or pH-neutral shampoo solution, depending on the recommended ratio for the product.
- Soak the microfiber mitt in the WASH bucket.
- Ensure that the vehicle has been pre-rinsed. If you haven't done so, return to the pre-rinse step
- Begin washing the car panel by panel, starting from the top (such as the roof first, followed by the bonnet and boot) and working your way down. Only use side-to-side or line motions as circular motion can cause swirl marks.
- After washing each panel, dunk the mitt into the rinse bucket and run it over the top of the grit guard (if you have one) to clean it thoroughly by removing as much dirt as possible before moving on to the next panel. Then, dunk the mitt inside the WASH bucket (step 3) and begin working on the next panel until the entire vehicle panel is clean.
- Lastly, rinse the car using a hose or water pressure to remove all soap residues.
DRYING THE VEHICLE
Things to prepare:

-
- One big drying microfiber towel (Clean) (ideal : 90cm-120cm)
- (optional) Heated Drying blower.
Microfiber towel:
To dry the car after washing, lay a microfiber towel flat on the painted surface and pull it towards you. Repeat this on different sections until the car is dry. Be sure to avoid letting the towel touch the floor or ground as it may pick up dirt or debris that can scratch the surface.
Storage: After you're done drying the car with the microfiber towel, it's essential to keep the towel in a dustproof area. Store it in a covered storage container to prevent any airborne debris from sticking to the microfiber fibers while it's drying. This will ensure that the towel remains clean and ready to use for the next time you wash your car.
Heated Drying blower:
Another option is to use a heated drying blower to blow the water off the car surfaces. This method can be quicker and more efficient than using a towel, but may not be available to everyone.
It's essential to avoid letting the car dry naturally or air dry as this can create dust particles or debris deposits in the water droplets, which can form water spots when it dries. By following these tips, you can ensure that your car remains clean and spot-free after washing.
MAINTENANCE
After washing a ceramic-coated vehicle, we highly recommend using a maintenance product such as CFC Graphene Maintenance, CFC Ceramic Queen, or CFC Glass Coat to help maintain the ceramic coating and keep the vehicle's finish looking its best.
To apply, first, spray 2-3 sprays of the product onto a plush microfiber towel. Then, spray 1-2 mists of the product onto the panel you want to treat. Wipe the product onto the painted surface evenly using the microfiber towel, then flip the towel to the dry section and buff off any remaining residue.
These maintenance products are designed to act as sacrificial layers, helping to protect and extend the life of the ceramic coating. They also add gloss, sleekness, hydrophobic properties, and can help combat water spotting issues. By using these products regularly, you can help ensure that your ceramic-coated vehicle remains looking its best for years to come.
CERAMIC INSPECTION
Even with the best quality ceramic coatings and the proper application techniques, over time, the coating can still break down due to exposure to the elements, regular wear and tear, and other factors. Therefore, an annual ceramic coating inspections are required by manufacturers to maintain the warranty on the ceramic coating
is highly recommended to have an annual (9-12 months or 7500km-10.000km) ceramic coating inspection to assess its condition and address any issues before they worsen.
Leave a comment